Warning!
Before starting work on any firearm be sure that the firearm is clear. Do not touch the trigger until the firearm has been cleared. Inspect the chamber to ensure that it is clear of ammunition and that there is no ammunition positioned to be chambered. Do not keep live ammunition near your workspace. Once you have checked the firearm, check it again!
Tactical Works, Inc. takes no responsibility for the accuracy and/or safety of this “how to”. This post is simply for your reading enjoyment. Before shooting any firearm have it inspected by a qualified gun smith.
Installing the SSS Savage Competition Trigger
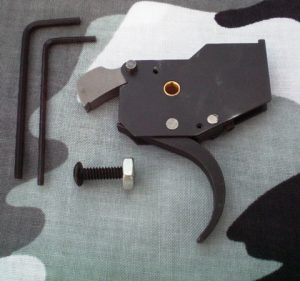
SSS Savage Competition Trigger
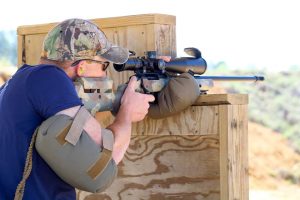
In this DIY tutorial, we will be installing a Sharp Shooter Supply Competition trigger in a Savage Model 10 FCP-SR. This trigger is a great value and will take your rifle and accuracy to the next level. The SSS Competition Trigger has an adjustable pull range from 2 pounds to 12 ounces. It also comes with installation instructions as well as allen key wrenches. In order to have a successful trigger install, below are a list of tools needed.
- Dremel Tool with a diamond dremel bit
- Vise
- Set of Allen Wrenches for stock or chassis removal
- 1/8” drift punch to remove the main trigger frame pin
- Small pair of Needle Nose Pliers to re-install the bolt release spring
- Blue Loctite
- Torque Wrench to reinstall the stock or chassis
Before you start, MAKE SURE YOUR GUN IS CLEAR AND UNLOADED. I cannot stress this enough. Safety First!!!
Step 1- Remove the bolt from the action
Step 2- Remove the front and rear action screws. (On a stock, you will remove the forward screw and the screw in front of the trigger guard. On a chassis such as a Stealth/MDT LSS chassis, you will only have 2 screws, remove both of them.
Step 3- Place your barreled action on a flat surface with the trigger facing up.
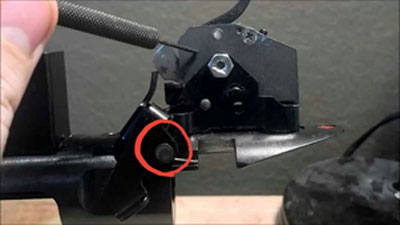
Step 4- Take your 1/8” drift punch and remove the Main Trigger Frame Pin shown in Figure 4-1.
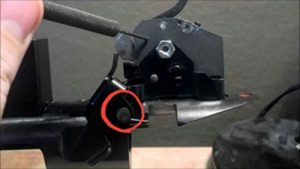
Figure 4-1
Once this pin is removed, slide the whole assembly forward towards the muzzle and pull up. It will come right out. Remove the bolt release lever and spring shown in Figures 4-2 and 4-3 below.

Figure 4-2
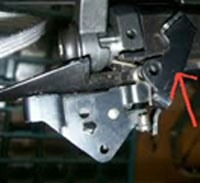
Figure 4-3
Step 5- Carefully remove the “C” Clip on the side of the Accutrigger and pull the trigger pin out. Pull the entire trigger free of the frame and lay it to the side.
Step 6- Take the main trigger frame and put it in your vise so you will have a steady working surface as shown in Figure 6-1. (Only for Accutrigger Models will you have to modify the main trigger frame. Pre-2004 Savages have a different trigger frame that does not need to be modified.)
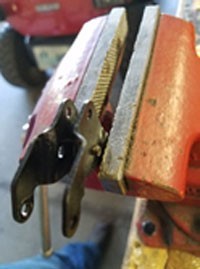
Figure 6-1
Step 7- With the diamond bit in your dremel tool, carefully grind a slot into main trigger frame to allow clearance for the stud on the SSS trigger. (Looking at the frame from the front with the holes facing up you will be grinding the left side) As shown in Figures 7-1 and 7-2

Figure 7-1
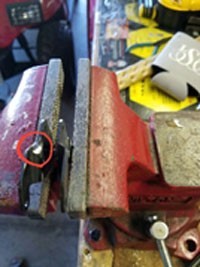
Figure 7-2
Step 8- Grind a little at a time and slide the SSS Competition trigger into the frame until the frame sits right against the new trigger housing as shown in Figure 8-1. (You don’t want anything binding as your trigger will not function properly if anything is smashed.)
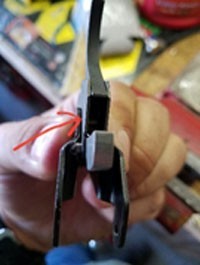
Figure 8-1
Step 9- Once your new SSS trigger will sit perfect in your trigger frame with the two back feet shown in Figures 9-1 and 9-2 sitting on top of the trigger frame and the screw holes (frame and trigger holes) lined up perfectly, insert the provided machine screw through the hole (doesn’t matter through which side) and thread the provided nut onto the screw on the opposite side. Tighten the screw with the provided allen key until it is snug. DO NOT TORQUE THE NUT DOWN!! Apply a small amount of blue LOCTITE in the middle of the nut being careful not to get any into the trigger.Wipe off excess if needed.
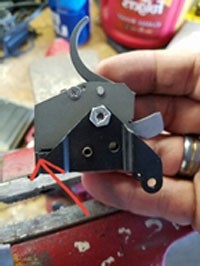
Figure 9-1
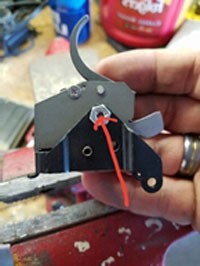
Figure 9-2
Step 10- Once the SSS Trigger is installed in the main trigger frame, place the lip on the back of the frame into the slot in the rear of the action.
Step 11- Re-install the bolt release lever the way you took it off as shown in Figure 11-1 below.
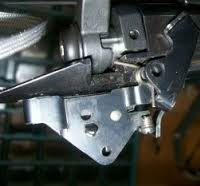
Figure 11-1
Step 12- Slide a small allen wrench through the holes of the bolt stop lever, main trigger frame and action as shown in Figure 12-1 allowing all of the components to line up correctly.
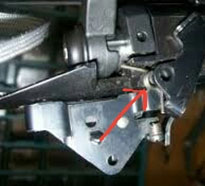
Figure 12-1
Step 13- Install the bolt release lever spring with the small pair of needle nose pliers and push your allen wrench through the spring and all the way through the bolt release.
Step 14- Take your main trigger frame pin and slowly push it through the hole on the spring side pushing the allen key out. (Exactly the opposite way you inserted the allen key.) This step may take some fooling with but take your time and you will get it. See Figure 14-1. (Main trigger frame pin re-installed)
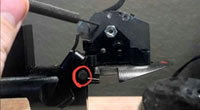
Figure 14-1
Step- 15- Slide your safety tab to the rear in the “Safe Position”. Use the smallest provided allen key to adjust “Screw D” clockwise until it touches the safety bar. (You can see it under the trigger housing). Once it is touching the safety bar, back it off 1/8 of a turn counter-clockwise. Install your bolt and “cock the gun” and pull the trigger and make sure IT WILL NOT FIRE WITH THE SAFETY ON!! If it does fire with the safety on, turn the screw clockwise until it won’t, making sure that your safety tab slides back and forth freely without binding.
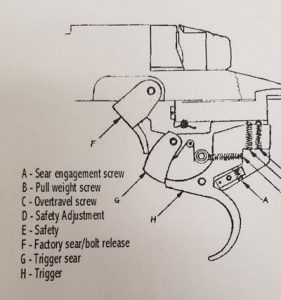
Figure 15-1
Step 16- “Screw C” is your Overtravel Screw. This screw will set your desired over travel. Turning the screw clockwise reduces the overtravel and counter-clockwise increases over travel. (If this screw is adjusted in all the way clockwise, it will not allow the trigger sear to engage.If this happens, turn the screw counter-clockwise until the sear will engage the trigger.)
Step 17- “Screw A” is the Sear engagement adjustment screw. A majority of your pull weight will be associated with this screw. This screw comes set from the factory for minimum sear engagement. It is advised to adjust this screw no more than one turn clockwise to reduce sear engagement, if you adjust this screw counter-clockwise, it will increase your trigger pull weight. Reducing the sear engagement introduces the risk of a slam fire or accidental sear disengagement.
Step 18- “Screw B” is your Trigger Pull Weight adjustment. You can set this screw where you so desire. Turning the screw clockwise increases your pull weight and turning it counter-clockwise reduces the pull weight.
Step 19- Once your trigger is adjusted to your preference, cycle the bolt no less than 100 times making sure you have no slam fires or unintentional sear disengagements. Also make sure your safety engages as well. SAFETY FIRST!!!!!!!!!!!!
Step 20- Once you’ve deemed your rifle “SAFE”, carefully lay the barreled action back into the stock or chassis. If you have a Savage Accustock, you will not have to modify the trigger guard or stock when reinstalling. If you have a Savage Stealth or MDT LSS chassis, you will have to open up the trigger hole about a ¼” forward to clear the new trigger housing. Your dremel with the same bit will do this easily.
Step 21- Once your action is sitting in your stock or chassis with no interference, apply a liberal amount of blue Loctite to the ends of the action screws. Thread the action screws into the actions and hand tighten them. With your torque wrench, tighten the rear action screw to 60 inch pounds and same for the front action screw. Once both screws are tightened to 60 inch pounds, tighten the rear action screw to 65 inch pounds.
You can, at any time, reinstall the Savage accutrigger. This modification isn’t permanent.
YOU’RE DONE!!!
Trigger Install Complete
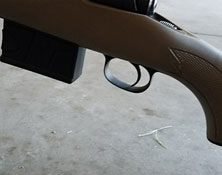
Trigger Install Complete
This install is well worth the finished product, I promise you!!!
As always, see you at the range.