“Black Rifle” Long Range Project

Posted in AR15, Tactical Works Home on November 4th, 2009 by Team TW

Many of the shooters we talk with have the same passion as we do. We love to shoot and we tend to have more than a few platforms to choose from when we exercise this passion.

Many sportsmen are now including the ominous “Black Rifle”  as a useful tool their shooting/hunting “tool belt”.  One of the great features of the AR15 is its modularity.  The AR15 platform allows the shooter and hunter alike to “design build” the rifle that best suites their needs for the conditions and targets that may cross their sites.  In addition, the ability to simply add and remove accessories helps mitigate the need for several rifles for differing conditions. With the AR15 it is very possible to punch paper during the day, swap the scope for night vision and go hog hunting that night.

In reality, a single AR15 receiver could be the platform for an unlimited number of rifle configurations. Tactical CQC, Varmint, Urban Sniper, Service Rifle, and on and on.

We are going to start a series of 3 “Black Rifle Builds” to include a long-range paper/varmint puncher, coyote/predator, and a basic minimum budget service rifle.

The first of our three builds will be the minimum budget service rifle. We’ll then move onto the Long Range Varmint Rifle. Third, we intentionally didn’t say last because we all know how addicting building ARs’ is and we’re pretty sure this will not be our last, a  dedicated predator hunter.

More to come soon.

Tags: , , , , , ,

MAG-XTENDER Installation Remington 700

Posted in DIY, Remington MAG-XTENDER, Tactical Works Home on August 31st, 2009 by Team TW


Installed MAG-XTENDER

Installation of the MAG-XTENDER on a Remington 700

This page will help you understand how to install the MAG-Extender on a Remington 700. Our subject is a Remington 700 .308 PSS.

Read more »

Tags: , , , ,

New at Tactical Works, Inc. TacOps Cheekpad

Posted in New Kit, TacOps Cheekpad, Tactical Works Home on August 23rd, 2009 by Team TW

Finally, we’re now stocking TacOps Cheekpads at www.tacticalworks.com!

OD Green TacOps Cheekpad

OD Green TacOps Cheekpad

If you depend on your equipment and trust that it will not fail in the field then you have to consider Tactical Operations equipment.

These stock packs are used all over the world in real situations and are Proven! Sure you can find stock packs that look like the TacOps however you’ll soon find out that the competition is the same price or more and is probably made over seas.

Lifetime warranty, four colors to choose from. Black, OD Green, Multi-Cam. and Digi-Cam. Left handed Stock Pack is available by special order.

TacOps Cheekpad Black

TacOps Cheekpad Black

TacOps Stock Pack Digi-Cam

TacOps Stock Pack Digi-Cam

Tags: , , , ,

New gallery edition: Savage 110

Posted in Tactical Works Home on August 3rd, 2009 by Team TW

Here is another example of why we do what we do and really enjoy it. Drew,  a fellow “Coloradoan”  contacted us regarding a Choate Ultimate Varmint Stock. After spending some time with Drew we discovered that he was just starting  a Savage 110 build.

Drew had on order a new barrel, barrel nut, and heavy recoil lug and needed to finish the build. He decided on the Ultimate Sniper Stock and then added a Tactical Bolt Handle, EGW Savage Tactical 0 M.O.A. Scope Base , Harris 6″-9″ Swivle Bipod, and our Competition Trigger.

The finished product looks awesom!  Drew says its a shooter and the next upgrade is new glass.

Click on the picture for more details.

Savage Choate Ultimate Sniper Tactical

Choate Ultimate Sniper

New gallery edition Savage 110

Posted in Savage EGW Tactical Scope Base, Savage Tactical Bolt Handle on August 3rd, 2009 by Team TW

One of the best aspects of being involved with Tactical Works, Inc. is the customer interaction. We get to share in others ideas  and dreams. The biggest reward is seeing the end result.

Nathan from Illinois  was nice enough to share some photos of his Savage 110 30.06 pre-accutrigger rifle after swapping a two piece scope base for 1-piece EGW Tactical 0 M.O.A. Scope base and upgrading from the Savage OEM bolt handle to our Tactical Bolt Handle.

Nathan will be refinishing/repainting the entire rifle in the near future.

Simply put, this rifle is practical and cool.

Thanks Nathan!

Click the picture to go to Nathan’s Savage page

Nathan's Savage 110 LA 30.06

Nathan's Savage 110 LA 30.06

Tags: , , , , ,

Savage Tactical Bolt Handle Installation

Posted in DIY, Savage Tactical Bolt Handle on July 22nd, 2009 by Team TW
Savage Tactical Bolt Installed

Savage Tactical Bolt Handle

Tools:

1/4″ Allen Wrench

Time:
5-30 minutes

First and foremost, as always, Safety First!!!

Every time you handle a firearm make sure it is unloaded. Don’t take anyone’s word for it. Check it, and check it again!

Once you rifle is clear, the first step will be to remove the Bolt. To remove the Bolt press down on the Bolt Release Lever which is on the right of the action, while simultaneously pulling the Trigger.

Removing Bolt From Rifle

The Sear needs to clear the trigger. Once the Sear has passed the trigger you can release the Trigger and pull the Bolt free of the action.

With the Bolt out of the rifle use the 1/4″ Allen wrench to remove the Bolt Assembly Screw. Turn the Bolt Assembly Screw counter-clockwise until the Bolt Assembly Screw is free from the Bolt.

Removing the Bolt Assembly Screw

Take your new Tactical Bolt Handle and install it on the Bolt where the original Bolt Handle was. The new Tactical Bolt Handle will only go on two ways so this is pretty easy to figure out. If you do it wrong the first time spin the Bolt Handle 180 degrees and you should have it right. No need to mark it, just slide it over the Bolt and replace the Bolt Assembly Screw in the opposite direction used for removal (clockwise).

Installing the Tactical Bolt Handle on the Bolt

Once the Tactical Bolt Handle is on the Bolt, simple press pull the Trigger while pressing the Bolt Release Lever down. Once you feel the Sear clear the trigger you can release the trigger and slide the bolt into the action.

Sliding the new Tactical Bolt Handle into the Action

Sliding the new Tactical Bolt Handle into the Action

That’s it! Enjoy your new Tactical Bolt Handle!

**If the new bolt handles hangs up a little on the action, cycle the bolt a number of times and it should loosen up. Keep in mind you’re putting a brand new part on a used gun so it might take a little shooting to get new Tactical Handle to be as smooth as the stock bolt handle.

***Additional Note from Tony, a helpful customer.

 “When the bolt is removed the firing pin is in the cocked position and  the rear portion of the cocking piece sleeve protrudes into the bolt  assembly screw blocking the insertion of the 1/4″ Allen wrench.  To  continue disassembly  the firing pin must be released moving the  cocking  piece forward. This can be accomplished by using a 7/16” box wrench on  the cocking piece pin to move it over the cam portion of the bolt body,  releasing the firing pin.


 For reassembly, once the new bolt handle is installed and the bolt  assembly screw is tightened, the firing pin must be re-cocked in order  to insert the bolt into the receiver. Again, the 7/16″ wrench can  be used to move the cocking piece pin back over the cam in the bolt  body.


 While those with experience may know this already, it might be  advisable to add these steps in the online instructions for first time  installers.”

Tags: , , , , , ,

Just Added: Karsten Cheek Piece A-model installation Instructions

Posted in DIY, Karsten Adjustable Cheek Rest on January 26th, 2009 by Team TW

Link to Karsten A-Model installation page

Tools needed:

  • Handrill
  • 1/4 Drill Bit
  • Pencil

Karsten “A” Kit:

  • 1-Saddle
  • 2-1/4 bolts
  • 2-Lock wheels
  • 1-Rubber pad

Estimated Time:

  • Less than 1 hr.

The first step in the installation of the A-model is to decide where on the stock you want the rest to sit. On bolt action rifles make sure you can cycle and remove the bolt once the cheek rest is installed.

Checking placement and bolt clearance

The bolt is pulled all the way to the back of the action as if it is going to be removed for cleaning.

Check the placement and the bolt clearance a few times to make sure it fits and the bolt will clear the saddle.

Mark all 4 top hole locations (left and right side of the stock) with a pencil or other marking device that will be visible once the saddle is removed from the stock.

Holes marked for Karsten Cheek Piece Install
Holes marked for drilling

Once all 4 holes are clearly marked get our your hand drill. This is the tough part. You’re going to be drilling four, 1/4″ holes in your stock.  Don’t worry, if you’ve checked the bolt clearance and you like the position of the saddle on the stock, it will all come together.

The stock we’re adding the Karsten cheek piece to is the stock Savage “tupperware” model which, is hollow, foam filled plastic. The hollow plastic stock is very easy to drill through.

With your hand drill use a 1/4″ bit and place the bit in the center of your first mark and drill. Slower is better here. You may want to center punch the marks and drill a pilot hole if you’re a perfectionist. We didn’t and everything lined up nicely.

Drill all 4 holes (two holes on the left side of the stock and two on the right) until you are through the plastic and into the foam.

Drill each hole through the plastic into the foam.
Drill each hole through the stock into the foam.

After all four holes are drilled, slowly align the back two holes by passing the drill bit in one hole out the other. Repeat on front holes.

Clean out the holes by drilling through both holes

Once you’ve cleaned out the holes in the stock, wipe the debris off the stock and slide the saddle over the stock.  With the saddle on the stock simply insert the bolts through the holes, and thread the lock knobs on.

Optional:

Included in the kit is a sheet of 1/8th inch rubber that can be glued to the upper exterior surface for a better contact area with the cheek. If you are in hot conditions and/or wear face paint regularly  affixing the rubber sheet will give you a more consistent, no-slip, cheek weld.

Suggested glue is  3M 80 or Hi Strength 90 to glue rubber in place.

Finished Product
Finished Product
Tags: , , , , ,

Just added: Karsten Cheek Piece B-Model Installation Instructions

Posted in DIY, Karsten Adjustable Cheek Rest on January 26th, 2009 by Team TW

Link to Karsten B-Model Installation Instructions

Karsten Cheek Piece B-Model Kit

Tools needed:

  • Handrill
  • 1/4 Drill Bit
  • Pencil

Karsten “B” Kit:

  • 1-Saddle
  • 2-1/4 bolts
  • 2-Blind nuts
  • 1-Rubber pad

Estimated Time:

  • Less than 1 hr.

The first step in the installation of the B-model is to decide where on the stock you want the rest to sit. On bolt action rifles make sure you can cycle and remove the bolt once the cheek rest is installed.

Checking placement and bolt clearance

The bolt is pulled all the way to the back of the action as if it is going to be removed for cleaning.

Check the placement and the bolt clearance a few times to make sure it fits and the bolt will clear the saddle.

Mark all 4 top hole locations (left and right side of the stock) with a pencil or other marking device that will be visible once the saddle is removed from the stock.

Holes marked for Karsten Cheek Piece Install
Holes marked for drilling

Once all 4 holes are clearly marked get our your hand drill. This is the tough part. You’re going to be drilling four, 1/4″ holes in your stock. Don’t worry, if you’ve checked the bolt clearance and you like the position of the saddle on the stock, it will all come together.

The stock we’re adding the Karsten cheek piece to is the stock Savage “tupperware” model which, is hollow, foam filled plastic. The hollow plastic stock is very easy to drill through.

With your hand drill use a 1/4″ bit and place the bit in the center of your first mark and drill. Slower is better here. You may want to center punch the marks and drill a pilot hole if you’re a perfectionist. We didn’t and everything lined up nicely.

Drill all 4 holes (two holes on the left side of the stock and two on the right) until you are through the plastic and into the foam.

Drill each hole through the plastic into the foam.
Drill each hole through the stock into the foam.

After all four holes are drilled, slowly align the back two holes by passing the drill bit in one hole out the other. Repeat on front holes.
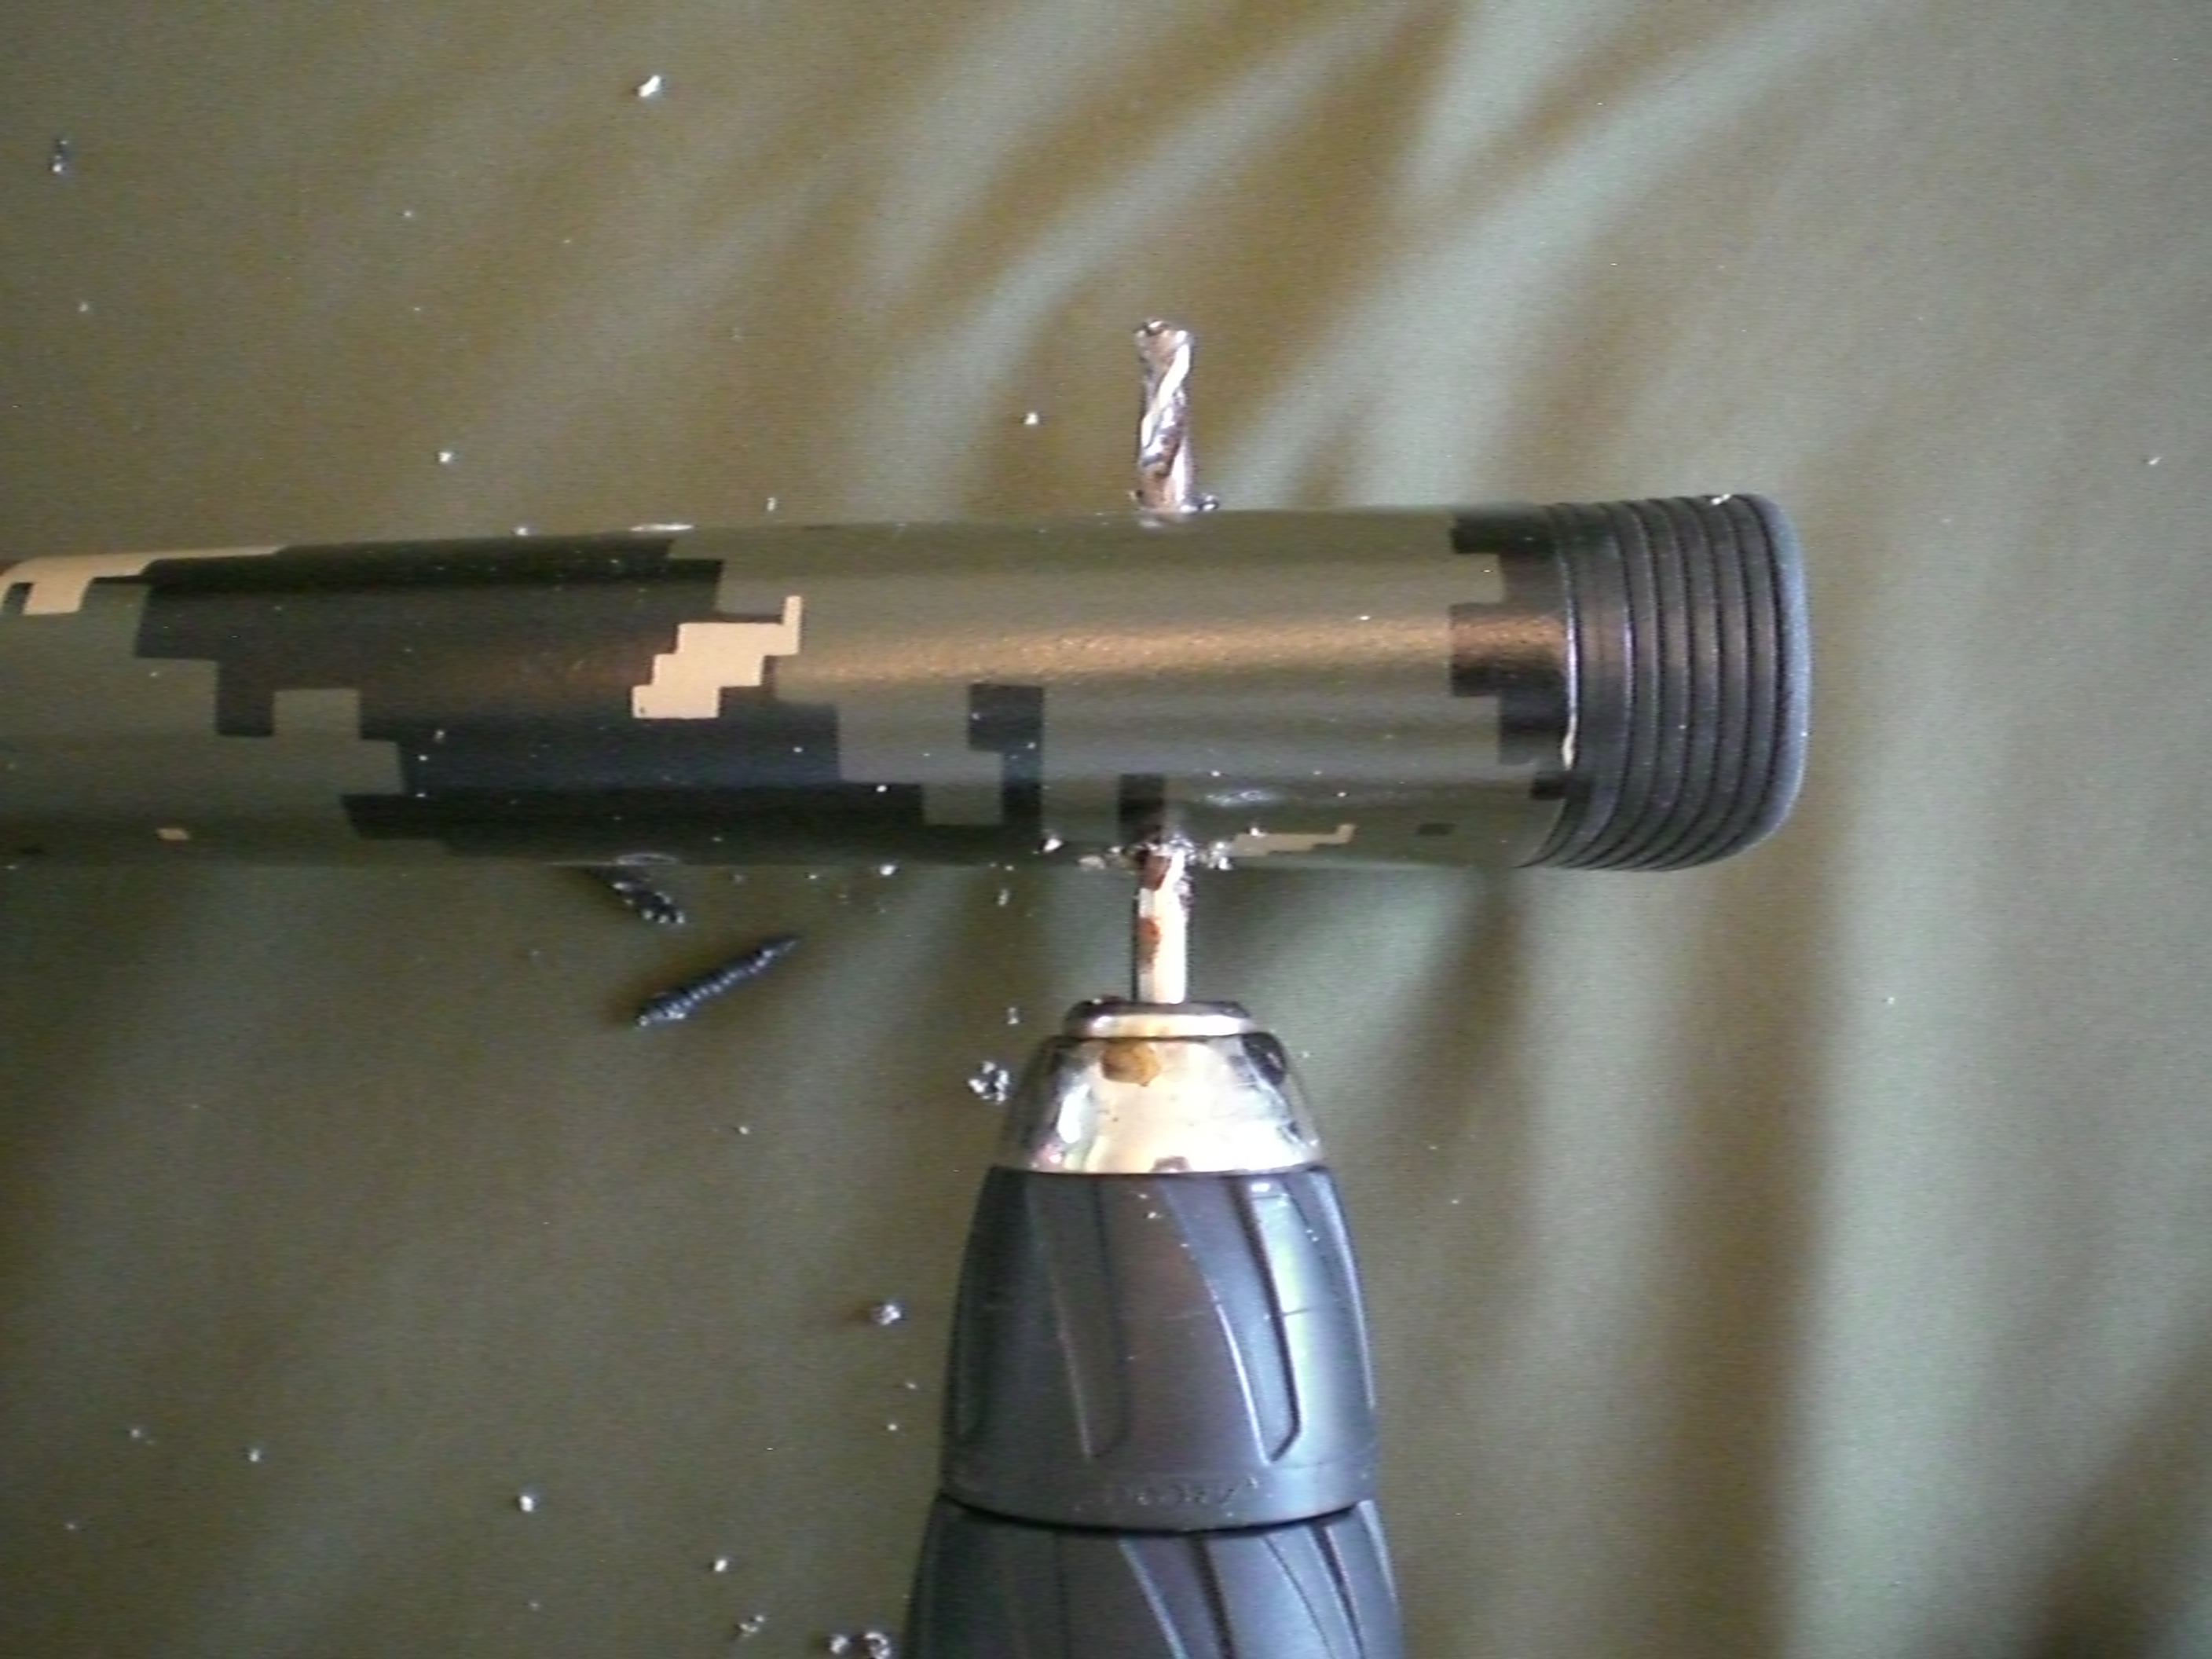
Clean out the holes by drilling through both holes

The B-Model is a little more work than the A-Model because of the blind nuts/inserts.  To accommodate for the width of the inserts it is necessary to expand the 1/4″ hole to a 3/8″ wide x 1/2″ deep in the left side (cheek side) of the stock.
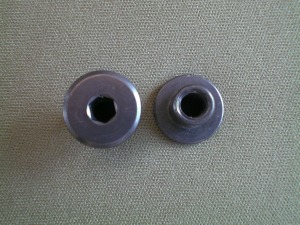
Allen insert 3/8" x 1/2"
Blind nut/insert 3/8″ x 1/2″

To do this use a 3/8″ drill bit and simply ream out the two existing holes on the left (cheek side) of the stock. Our example is again, the OEM Savage “tupperware” so we only needed to drill through the plastic which was pretty thin.

Drilling existing holes for the inserts.

Once your holes are done you’re ready to test fit the saddle and bolts. In many cases the bolts will need to be shortened to get the right fit. Our stock is pretty narrow so the bolts had to be shortened.

Bolts are sticking about 1/4 through the stock

To Shorten the bolts a hand grinder was used to trim off about 1/4″ of the bolts.

Mark the threads where they need to be cut down. We needed to trim about 5 threads off each bolt. We cut the bolts flush with the stock.

The bolts were marked by threading on a nut to where the cuts need to be. The nuts were then taped into place with painters tape. The cuts were made with the bolts out of the stock. After the cuts, the tape was removed and the bolt was backed off to clean up the threads. CAUTION! The bolts do get hot. Wear gloves or let the bolts cool before handling.

Slide the saddle back on the stock, run the bolts through the saddle and stock then thread on the blind nuts/inserts.  If the bolts are still to long do a little more trimming and repeat until you achieve a good fit.  If the bolts can be tightened enough to secure and hold the cheek piece in position you’re done. Adjust the saddle to your liking, tighten the inserts with a 3/16″ allan/hex key and go shooting!

Optional:

Included in the kit is a sheet of 1/8th inch rubber that can be glued to the upper exterior surface for a better contact area with the cheek. If you are in hot conditions and/or wear face paint regularly affixing the rubber sheet will give you a more consistent, no-slip, cheek weld.

Suggested glue is 3M 80 or Hi Strength 90 to glue rubber in place.

Karsten Cheek Rest B-Model Finished
Tags: , , , , ,

Karsten’s Tips and Tricks

Posted in DIY, Karsten Adjustable Cheek Rest on January 22nd, 2009 by Team TW
Karsten Cheek Piece Tips and Tricks

Karsten Cheek Piece Tips and Tricks

Link to Karsten’s Tips and Tricks
I use a drill press as it makes it a lot easier keeping everything plumb. I also use a small torpedo level (6 inch plastic available at Home Depot if you don’t have one for about $4.00, good ones run about $12.00)

I loop a rubber band over one end of the level, place the level on the stock and loop the rubber band under the stock and the other end of the level.

Place the level on the flat portion of the stock just forward of the wrist.

Drill 1/4 inch hole straight through keeping the stock as level as possible while drilling.

SIMPLE Method for use with hand drills.

Position cheek piece and mark for holes on each side. Drill one side half way through

The stock, turn over and drill the other side the rest of the way though.

Elongate one hole should you be off a little after drilling for easier installation.

Note, if you mess up and get a little off on one or both holes just elongate one of the holes horizontally. This will give you some play front to back but still remain secure as the one hole is 1/4 inch.

You will need to counter sink up side of the stock to open the hole up to 3/8 inch but only to a depth of and 3/8’s of an inch. (Only applies to Flush Insert style)

With Insert style adjusters it may/will be necessary to shorten bolt due to varying width, placement or style stock.

Included you will also find 1 piece of 1/8th inch rubber that can be glued to the upper exterior surface for a better contact area with the cheek.

I use 3M 80 or Hi Strength 90 to glue rubber in place.

*If you find the cheek pieces tight on your stock, boil some water and heat the upper surface up and open up gently to fit.

** IMPORTANT, For Bolt Action stocks check the desired position while cycling the bolt at varied heights. Also check to see if you can remove the bolt without lowering or removing the cheek rest if that is important to you.

On AR15 type rifles be sure to drill the through holes lower than the buffer tube and check that the charging handle operates correctly and not blocked by the cheek rest.

Most claim it take 5 to 10 minutes.

Tags: , , , , ,

New at Tactical Works, Inc. Karsten’s Adjustable Cheek Rest

Posted in Karsten Adjustable Cheek Rest, New Kit on January 4th, 2009 by Team TW

We’re honored to offer the Original Karsten’s Adjustable Cheek Piece as a solution for our customers.

If you’re struggling to get a good cheek weld and keep your eye in line with your scope your not alone. With 50mm+ now being the norm for scope objectives, a comb riser or cheek piece is required to ensure a fast, solid, repeatable, reliable cheek weld.

If you have an existing rifle stock and do not have the desire to replaces it with an adjustable stock,  take a close look at this cheek piece.

This is a company who stands seriously stands behind their products. There are thousands of Karsten’s cheek pieces in service all over the world.

In Karsten’s words “If its not combat ready, I won’t sell it!”

Order A-Model

Order B-Model

Tags: , , , ,