New ENVY Chassis by XLR Industries released

Posted in New Kit, Remington 700 on August 3rd, 2017 by KrowRN

XLR Industries has just released the ENVY Chassis for the Remington 700 Short Action. We have been impatiently waiting for these since SHOT Show this year and are very excited to have some in hand!!

ENVY Chassis by XLR

Envy Chassis by XLR Industries


Here is the press release from XLR Industries with information about the new ENVY Chassis:


For Immediate Release: August 1, 2017

XLR Announces the Release of the ENVY™ Rifle Chassis System

The highly anticipated ENVY™ offers a winning blend of features, function, and durability. It was designed specifically for those shooters who desire professional level precision.

Grand Junction, CO. – August 1, 2017.

XLR, a leading U.S. manufacturer of custom rifle chassis and components, is proud to announce the release of the ENVY™ precision rifle chassis. The feature-rich ENVY™ was developed from the ground up through years of cooperation with some of the best shooters in the world.

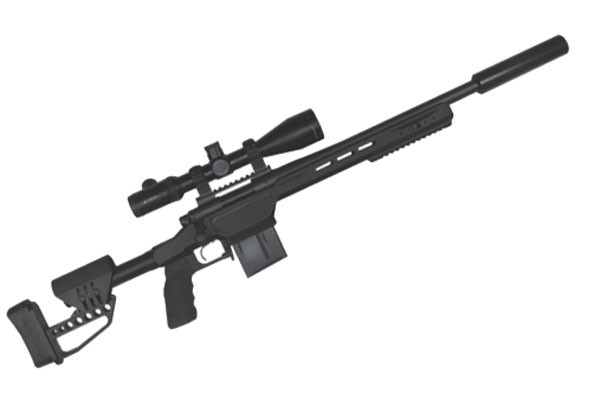
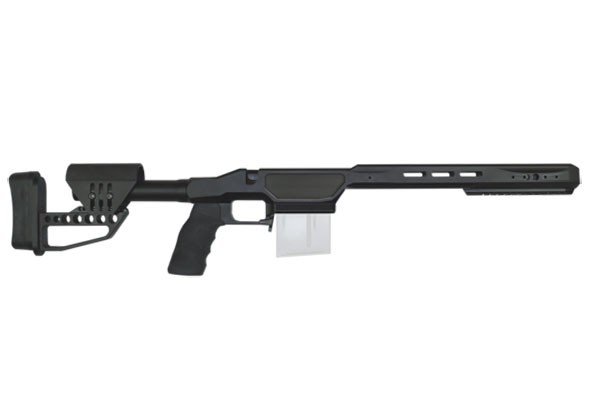
The ENVY™ rifle chassis has a base weight of 35 oz (without buttstock or grip) and will initially be available for the Remington 700 short action and clones. The sleek, one-piece design is constructed from rigid 6061-T6 aluminum for an ultimate balance of lightness and durability. A multi-point radial cut inlet allows the receiver to sit in the chassis stress-free for the utmost in accuracy (no V-block). As with all XLR chassis, the ENVY™ is a direct bolt-on application with no gunsmithing or setup required by the user.

Unique to the ENVY™ is the integrated, Arca-Swiss™ style 1.5” dovetail mount on the forend. This allows the chassis to be used with a camera tripod. Having the mount integrated ensures that it will never come loose during strings of fire. It also allows for a longer dovetail than a traditional bolt-on adapter would, which provides for more versatility in balancing the rifle by sliding it forward and aft.

The integrated detachable magazine system allows the use of AICS style magazines. A new style of magwell features a larger, tapered opening for faster magazine changes and has an angled, serrated face that can serve as a barricade stop. In addition, the ENVY™ also features an integrated 5.5” picatinny rail located on the bottom of the handguard as well as five strategically placed QD sling sockets. An integrated bubble level keeps cant issues in check. The M-LOK™ compatible handguard allows the shooter the option to custom-tailor the chassis with M-LOK™ accessories.

“What we have put together is the perfect package for your competitive, PRS style shooter,” said Matt Means, Sales Manager for XLR. The ENVY™ has more integrated components than any other chassis in its class. This highly anticipated product release will satisfy the needs of anyone seeking a durable and highly adaptable rifle chassis. The ENVY™ will of course come with our lifetime warranty.”

The basic ENVY™ package is priced at $740 with many upgrades and options available. The ENVY™ is available now on the company’s official online store at www.xlrindustries.com.
About XLR

XLR is a U.S. based manufacturer of world-class rifle chassis, components, and accessories. The company manufactures the renowned Element, Evolution™, Carbon, and Envy™ chassis systems for professional shooters, tactical shooters, and hobbyists alike. Using only the finest materials and state-of-the-art manufacturing processes, XLR strives to maintain its reputation for quality and tactical innovation.

Contact Information
Matt Means · Sales Manager · [email protected] · (970) 241-1807
XLR · 2323 Grand Park Drive · Grand Junction, CO · 81505

Tags: , ,

Gallery update, Jimmy’s Remington 700

Posted in Badger Ordnance, Choate, Gallery, Remington 700, Tactical Operations on August 9th, 2012 by Team TW

Our gallery has been updated to include Jimmy’s Remington 700 SPS Tactical. Click on the photo for more picts and specs.


Jimmy's Remingtion 700

Jimmy's Remingtion 700

Jimmy’s Remington 700


Tags: , , ,

Gallery update Steve’s Radical Remy

Posted in Choate, Remington 700, Tactical Works Home, Uncategorized on July 17th, 2012 by Team TW

Our gallery has been updated to include Ricks Remington 700 SPS Tactical. Click on the photo for more info.

Tags: , , ,

CDI/Choate Tactical Package Installation

Posted in CDI, Choate, DIY, Savage on September 22nd, 2011 by Team TW
CDI Precision Savage Bottom Metal

CDI Precision Savage Bottom Metal

We have been offering CDI Precision Gunworks Bottom Metal and Choate’s Tactical Stock for a while now. One of the top questions that we have been receiving is, “Can I buy the Choate stock and have you inlet it for the CDI bottom metal”? You asked and we have delivered!  We now offer our Choate Tactical stocks already inletted for the CDI bottom metal.

Read more »

Tags: , ,

Badger Ordnance M5 Choate Tactical Stock Package Installation

Posted in DIY, Remington 700, Tactical Works Home on December 14th, 2010 by Team TW

WARNING


Warning!

Before starting work on any firearm be sure that the firearm is clear. Do not touch the trigger until the firearm has been cleared. Inspect the chamber to ensure that it is clear of ammunition and that there is no ammunition positioned to be chambered. Do not keep live ammunition near your workspace. Once you have checked the firearm, check it again!

Tactical Works, Inc. takes no responsibility for the accuracy and/or safety of this “how to”.  This post is simply for your reading enjoyment. Before shooting any firearm have it inspected by a qualified gun smith.

Installing the Badger Ordnance M5 Trigger Guard with the Choate Tactical Stock

Badger M5 Choate Installation

Until now installing a dropbox magazine on your Remington 700 ADL or BDL required sourcing all of the parts and then sending your stock off to a gunsmith to be inletted. This required paying to ship your stock, waiting, and then paying to have the stock sent back. Now you can order a complete solution that is bolt-on, out-of-the-box, and can be assembled in less than an hour without special tools.

Parts:

  • Choate Tactical Stock Inletted for the Badger Ordnance M5 Trigger Guard.
  • Badger Ordnance M5 Trigger Guard Kit. (kit includes trigger guard, 5-shot magazine, 2 #3o Torx screws, 2 aluminum pillars)

Badger M5 Choate Installation

Tools:

  • 5/32 Hex/Allan Key
  • #30-Torx Driver and/or Socket
  • Calibrated Torque Wrench

Time:

Less than one-hour.

Remove all optics and accessories that might get in the way or be damaged during installation. Our subject rifle is a Remington 700 PSS. The original floor plate has been replaced with a MagXtender however, installation is the same for rifles that  have the OEM floor plate.

Badger M5 Choate Installation

Remove the Bolt from the rifle. Press the Bolt Release button which is located in the top of the trigger guard in front of the trigger.

Badger M5 Choate Installation

While the Bolt Release button is depressed, slide the bolt all the way back until the bolt is free of the action. Set the bolt aside until ready to reassemble.

Badger M5 Choate Installation
Use a 5/32″ Hex key to remove the two trigger guard screws.
Badger M5 Choate Installation

Badger M5 Choate Installation

Once both action screws are removed, the trigger guard will be free from the original stock and barreled action. Gently pull the trigger guard from the stock while supporting the barreled action. Make sure the barreled action is supported or it will drop free from the stock and can be damaged.

Badger M5 Choate Installation

Remove the trigger guard and the internal magazine box from the stock. The entire trigger guard and internal magazine will not be reused. Remove parts from the workspace for the remainder of the installation. Remove the barreled action from the stock and place it out of the way as well. The stock will not be used again for this project.

Badger M5 Choate Installation

Gather the new Choate Tactical Stock, the Badger M5 Trigger Guard, and both of the supplied T-30 Action Screws and place them on your workspace. The supplied Badger Ordinance Pillars are not used for this application. This is due to the full length aluminum bedding block used in the Choate Tactical Stock.

Badger M5 Choate Installation

Place the barreled action into the Choate Tactical Stock. Supporting the barreled action, turn the rifle over and insert the Badger Ordnance M5 Trigger Guard into the inlet stock. Insert the longer of the two #30-Torx action screws into the rear of the trigger guard. The shorter of the two #30-Torx action screws installs in the front of the trigger guard.

Badger M5 Choate Installation

To get the action screws started, thread them by hand to avoid damaging the threads on the action screws and more importantly the action. Once the action screws are started, slowly and carefully tighten them equally taking time to make sure neither of the action screws are too long. If one or both of the action screws are too long you will need to either trim the supplied action screws or purchase new shorter screws. The action screws are a 7/28 thread that can be found at most chain hardware stores.

Badger M5 Choate Installation

When both action screws are snug and are the proper length to clear the bolt use a #30-Torx driver to torque them to 65 in-lbs. Caution! Failure to torque the action bolts with a calibrated Torx Driver may result in damage to the rifle! Per Badger, LocTite not needed.

Badger M5 Choate Installation

After installing the trigger guard double-check that the action screws will clear the bolt and install the bolt. Next insert the supplied Accuracy International 5-shot magazine into the Badger Trigger Guard. With the rifle unloaded cycle the bolt to make sure that the bolt cycles freely and does not hang up on the magazine.

Installation complete.


Tags: , , ,

Gallery Updated “Ace’s & “Triplets”

Posted in CDI, Choate, Remington 700, Savage, Savage EGW Tactical Scope Base, Tactical Works Home on May 6th, 2010 by Team TW

The Gallery was updated to include two more pictures. First is Ace’s three custom rifles. He is gearing up for a shoot this weekend (May 7th & 8th) in Tennessee and we wish him the best of luck. Ace runs TN Predators Forum which is a good resource for information on hunting and calling.

tactical long range savage

Pre-shoot prep. "Ace's"

The second update to the Gallery is three “shop” rifles that we have been working on.

First is a Remington 700 .308 PSS wearing a Choate Tactical Stock, Harris Bipod,  EGW Heavy Duty Rail, Burris XTR rings, CDI Bottom Metal Conversion,  and a Falcon Menance.

Second is a Savage 10 .308 with a Choate Tactical Stock, EGW rail, Competition Trigger, Harris Bipod, BT bolt handle, CDI Bottom Metal Conversion,  and a Super Sniper 10X.

Last but not least is a Savage 110 30.06 with a Choate Tactical Stock, Choate Adjustable Butt Place, ER Shaw Barrel, Heavy Recoil Lug, Competition Trigger, EGW Heavy Duty Rail, EGW “Practical” rings, and a Bushnell Elite 3200 10X.

The "Triplets"

Tags: , , , ,

CDI Precison Remington 700 Field Report at Pikes Peak Gun Club

Posted in Remington 700, Remington MAG-XTENDER, Tactical Works Home on January 12th, 2010 by Team TW

Sunday we decided to stray from the “TW Proving Grounds” in an effort to do some longer range shooting and test out the first of our Remington 700 CDI Precision rifle builds. It was suggested that we check out the Pikes Peak Gun Club just outside of Colorado Springs, CO.

It  was one of the many beautiful sunny winter days that bless Coloradans so we jumped at the opportunity and headed out.

Upon arrival we had to fight the crowd of 100+ skeet shooters who had just finished a shoot. Lots of folks, lots of trucks. Once inside we got the lay of the land and headed out to shoot.

Pikes Peak Gun Club looks to cater to trap and skeet shooters however their pistol and rifle ranges are organized and nice. The rifle range is 200 yards max but worked well for testing purposes.

If I remember correctly there are 16 rifle lanes, 8 left and 8 right. The left lanes have wood benches and are covered. The right lanes have concrete benches and there is ample room to shoot prone from a concrete pad.

After setting up a target at 50 yards and another at  100 yards the range went “Hot” and it was time to shoot.

As we were setting up we were approached by a recently retired Aurora Police officer questioning what we were shooting. As I started to explain our arsenal he stopped me and said “No, what is that?”  pointing at our Remington 700 PSS dawning a Choate Tactical Stock, Falcon Menace 8X18, Burris XTR Rings, EGW Steel Tactical Base, finished nicely with CDI Precison’s 10 round AICS drop box mag.

He quickly pushed aside the four AR15s we brought, as he mumbled “I’ve seen plenty of those” to get to the Remy.  After fondling the rifle for a few minutes he backed away and simply said “Now that’s gorgeous”.

With all of the gear and 10 rounds in the mag. the Remy still feels light weight and maneuverable.

We put 3 rounds in the 10 round AICS mag and cycled them at a normal rate. No malfunctions. We  loaded 5 rounds and cycled at a normal rate, no issues. On to 10 rounds.  Again, 10 rounds no issues.

Next test rapid fire, 10 rounds down the tube, fast! One after another the rounds chambered and ejected with a nice “spring in their step”. The empty casings ended up in a nice little pile about 10″ from the weapon.

The rest of the day on the CDI Remy was like clock work.  As the day went on a few other shooters stopped by to chat about the Remy and ask how accurate it was. Unfortunately, this was the first outing for this rifle and we weren’t delivering very tight groups so we looked a lot better than we preformed.

We didn’t get the chance to run any real-time mock situations at the club however we plan on heading back to the TW Proving Grounds to run it through some real world exercises when time permits.

All in all the rifle preformed as designed and the CDI Bottom Metal looked and felt like factory.

As we drove away from the club and into the sun dropping behind Pikes Peak we had to agree. Great product, great place, great day!

Tags: , ,

MAG-XTENDER Installation Remington 700

Posted in DIY, Remington MAG-XTENDER, Tactical Works Home on August 31st, 2009 by Team TW


Installed MAG-XTENDER

Installation of the MAG-XTENDER on a Remington 700

This page will help you understand how to install the MAG-Extender on a Remington 700. Our subject is a Remington 700 .308 PSS.

Read more »

Tags: , , , ,