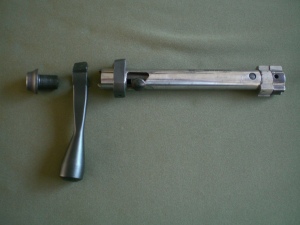
Savage Tactical Bolt Handle Installation
Posted in DIY, Savage Tactical Bolt Handle on July 22nd, 2009 by Team TW
Savage Tactical Bolt Handle
Tools:
1/4″ Allen Wrench
Time:
5-30 minutes
First and foremost, as always, Safety First!!!
Every time you handle a firearm make sure it is unloaded. Don’t take anyone’s word for it. Check it, and check it again!
Once you rifle is clear, the first step will be to remove the Bolt. To remove the Bolt press down on the Bolt Release Lever which is on the right of the action, while simultaneously pulling the Trigger.

The Sear needs to clear the trigger. Once the Sear has passed the trigger you can release the Trigger and pull the Bolt free of the action.
With the Bolt out of the rifle use the 1/4″ Allen wrench to remove the Bolt Assembly Screw. Turn the Bolt Assembly Screw counter-clockwise until the Bolt Assembly Screw is free from the Bolt.

Take your new Tactical Bolt Handle and install it on the Bolt where the original Bolt Handle was. The new Tactical Bolt Handle will only go on two ways so this is pretty easy to figure out. If you do it wrong the first time spin the Bolt Handle 180 degrees and you should have it right. No need to mark it, just slide it over the Bolt and replace the Bolt Assembly Screw in the opposite direction used for removal (clockwise).

Once the Tactical Bolt Handle is on the Bolt, simple press pull the Trigger while pressing the Bolt Release Lever down. Once you feel the Sear clear the trigger you can release the trigger and slide the bolt into the action.

Sliding the new Tactical Bolt Handle into the Action
That’s it! Enjoy your new Tactical Bolt Handle!
**If the new bolt handles hangs up a little on the action, cycle the bolt a number of times and it should loosen up. Keep in mind you’re putting a brand new part on a used gun so it might take a little shooting to get new Tactical Handle to be as smooth as the stock bolt handle.
***Additional Note from Tony, a helpful customer.
“When the bolt is removed the firing pin is in the cocked position and the rear portion of the cocking piece sleeve protrudes into the bolt assembly screw blocking the insertion of the 1/4″ Allen wrench. To continue disassembly the firing pin must be released moving the cocking piece forward. This can be accomplished by using a 7/16” box wrench on the cocking piece pin to move it over the cam portion of the bolt body, releasing the firing pin.
For reassembly, once the new bolt handle is installed and the bolt assembly screw is tightened, the firing pin must be re-cocked in order to insert the bolt into the receiver. Again, the 7/16″ wrench can be used to move the cocking piece pin back over the cam in the bolt body.
While those with experience may know this already, it might be advisable to add these steps in the online instructions for first time installers.”


